Friday, December 9, 2011
Thanks to June.....Rectangles


Thursday, December 8, 2011
And then the Rectangles
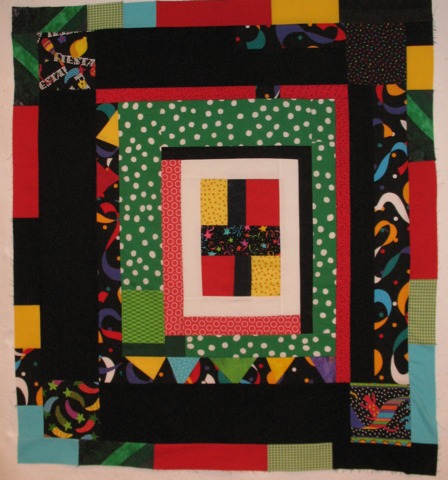
Well, I have tried and tried to upload the picture of this step/border. But I can't find it on my computer..... really, I think the picture fairy stole it. And I uploaded it to my Liberated Yahoo Groups folder, but it won't let me transfer it here. So you will have to imagine the last picture, now add in your mind brightly colored rectangles, approx. 2 1/2 in, by 4 to 6 in. all the way around the outside. That's it. Remember I said we are in the middle of the Christmas season? I was trying to keep it simple and get it done fast. But......next border may not show up for another 6 months. Since the element is curves, I decided to use Victoria at Bumble Beans blog method for doing curved piecing. Trying to mimic the streamers in the other fabrics. Well..... at this point I'm not sure how successful the technique is working for this project. But I REFUSE to applique! Just sayin', I know that would work and give me beautiful curves, but not doin' it! :)
Next up: Squares

A Little Progress....

Latecomer to the Round Robin Party
 Jo in PA here.
Wow, I can't believe I am this late getting to the Round Robin party.
Maybe I will get the booby prize. Oh, well, better late than never. I had good intentions of starting this way back when the idea was first proposed. But it is easier to think about sewing than it is to actually DO it. So this was in my head and I even started the center block, and then..... got stuck.
So fast forward 6 months and progress occurs!
Saturday, November 26, 2011
Colours of Life

Didn't finish it as it was getting too big to do squiggles.
It was my Mother's 80th birthday party last week. I was going back to the UK for it and needed something to give her.
She's been on at me for ages to make her a lap quilt to keep her knees warm so I pulled this out, took a deep breath and machine quilted it. Just straight lines, using 1" masking tape as a guide. Not bad for a first attempt!
Finished size approx 48" by 46".
Sunday, October 30, 2011
Funny You Should Ask!

So Where Are The Liberated Round Robin Participants?

Thanks!
Love, Pat--who has finished and given hers away. See my post here:
Monday, September 19, 2011

A little progress at last!
I'm not sure what step I'm up to, but I've had fun today playing with my round robin. This is my first attempt at liberated letters and I'm quite happy with them. Thanks Nancie for all the hints I found in your previous posts about this.
I'm thinking of filling the gap under the letters with strings and then maybe making a border all round with the green batik. Then I'll face the curves!
Sunday, September 11, 2011
Working on Phase 6


9/14 Quilting completed and ready for binding.

And then a close-up of the actual quilt.

It may be a couple of days before I can work on the completion of my quilt, but with someone expecting it. I'll get it done. Maybe even next week!
Sunday, September 4, 2011
LibRR1 Round 6: Ready to Use or Give Away
Change your project into a quilt! Make the sandwich and join it together and close it up!
Let us know what is going to happen to your project once it is completed!
Take pictures and share!
Round 6 is added so you can show your project after it's quilted, bound, and ready to use or give away!
(I misread the notes - this was supposed to be the ending step after embellishing and finishing up - June)
Let us know what is going to happen to your project once it is completed!
Take pictures and share!
Round 6 is added so you can show your project after it's quilted, bound, and ready to use or give away!
(I misread the notes - this was supposed to be the ending step after embellishing and finishing up - June)
Monday, August 29, 2011
Dogs and Dots Final Round

This has been a great Round Robin. I had so much fun and it has been a real learning process for this Rookie. I do hope we do another one in the near future. Thanks so much for a wonderful experience!!
Saturday, August 27, 2011
Me and You: True Blue -- all finished!

Free Motion Quilting : done
Binding: done
Label on back: done
Hanging strip:done
Photos: done
So that's it!! My RR quilt is finished, ready to give to my friend when she arrives September 8. What an interesting project to start out not knowing more than that I would use the blue fabrics I had on hand. I liked the idea from Gwen and Freddy of 2 chickens representing them and their freindship. I actually made a few of Freddy's Chickens but did not like the fussiness of piecing them. So I just free-handed my own chickens, which turned into a couple of sassy wonky birds instead! Thanks, June and Nancie, for putting the RR together, keeping it all organized, and for your support along the way. It's been fun and I've got a quilt to give my friend as a bonus! Mary
Wednesday, August 24, 2011
A Good Time!
Thanks to June and Nancie for organizing our Liberated Round Robin. I've had a good time working on my quilt, and I learned some new things from making my quilt. It's been fun to see what everyone has done with their center square.
This morning I figured that I would call my quilt finished and tie it for a charity quilt, because I like some of the borders but am not crazy about the entire quilt. My daughter came to visit today, and just as she was leaving she saw the quilt on my design wall: "That's wonderful, Mom!" "Really, Libby? Do you want it?" The answer was "Yes, but could it be made bigger?", so now I'm motivated to add more borders and make it big enough for her to nap under.
It's good to remember that we all see things differently. I don't like the quilt's center square, yet my daughter told me it's just right, don't change a thing.
Again, thanks for our Round Robin.
This morning I figured that I would call my quilt finished and tie it for a charity quilt, because I like some of the borders but am not crazy about the entire quilt. My daughter came to visit today, and just as she was leaving she saw the quilt on my design wall: "That's wonderful, Mom!" "Really, Libby? Do you want it?" The answer was "Yes, but could it be made bigger?", so now I'm motivated to add more borders and make it big enough for her to nap under.
It's good to remember that we all see things differently. I don't like the quilt's center square, yet my daughter told me it's just right, don't change a thing.
Again, thanks for our Round Robin.
Monday, August 22, 2011
LibRR1 Round 5: Embellish and Finish
Now is the time to add the finishing touches to your quilt.
Make it bigger or longer, if you wish.
Wrap up this gorgeous creation by adding whatever it needs!
And if it’s “just right” the way it is, rejoice!
Please post a photo of your project after you have adding anything new, along with notes so we can all learn from your process.
Label the post with your name and Round 5 Embellish and Finish, to show how you finish the top of your project!
Words by Nancie V, posted by June. Modified later by June
Make it bigger or longer, if you wish.
Wrap up this gorgeous creation by adding whatever it needs!
And if it’s “just right” the way it is, rejoice!
Please post a photo of your project after you have adding anything new, along with notes so we can all learn from your process.
Label the post with your name and Round 5 Embellish and Finish, to show how you finish the top of your project!
Words by Nancie V, posted by June. Modified later by June
Subscribe to:
Posts (Atom)