Webster's defines serendipity as "The occurrence and development of events by chance in a happy or beneficial way: "a fortunate stroke of serendipity."
Just call me the finder of serendipity. When I finished the last round of this RR, I looked at my two pieces and really didn't have any idea where I'd go next. I didn't even like them all that much. But I'm not one to give up, so I just set them aside and waited for something to strike my fancy. Then the "directions" came out for the next step - "Serendipity." Huh? I had no idea what that meant as far as quilting went - until yesterday.
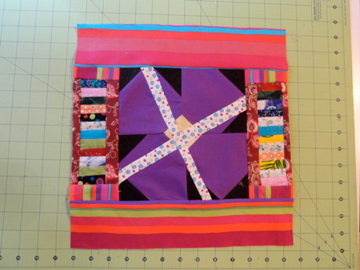
I was pretty tired after doing some water aerobics, and decided to quit sewing for a bit and take a nap. As I was cleaning up and putting some things aside, I had to pick up a stack of little wonky stars that I'd made several months ago as leaders and enders. Then about 15 minutes later, just as I was dropping off to sleep, it hit me. "Use those stars!" I'd been wondering what I'd do with them, and I realized I could use a bunch of them on these liberated pieces. I put them on the sides only - I think I'll start going rectangular on these instead of square.
Showing posts with label Cyndi. Show all posts
Tuesday, June 5, 2012
True Serendipity
Click to see other examples with this label:
Cyndi,
LibRR2 Step 4
Sunday, May 13, 2012
Adding color...and I found an old UFO to use
As I was going through my drawers in my sewing room today, I discovered this:
I had started it last year for a challenge, and put it away while I got distracted with dozens of other projects. It uses pretty much the same process as the one we're doing for this project, so I decided that I'd just do two of them now.
This step is to add color. As you look at this piece, you can see lots of yellow. I had a nice canary yellow solid in my stash, and added borders to this piece. I think they brought everything together quite nicely. : )
The piece below is the one I started for this current project - it began with the pansy block. I wanted something bright and cheery, and was torn between red and green. My red wasn't cheery enough - so I went with the green:
Click to see other examples with this label:
Cyndi,
LibRR2 Step 3
Saturday, April 7, 2012
Cyndi's Step 2
Remember this step 1?
I hung it up on my design wall, and every time I looked at it, I liked it less and less. I know that putting slashes through blocks was what we were supposed to try, but this just looked like a pansy with a slash through it. I really liked what Janet did with her pansy - she cut it in four pieces, and stuck a different block in the middle, so the pansy almost disappeared.
So today I decided to separate the pansy a little.
So this is my re-do of step 1.
Next, I tackled step 2. I had lots of already-made crumb fabric. I added a little more of the black/dots fabric, and cut strips of the made fabric for borders around it all.
Click to see other examples with this label:
Cyndi,
LibRR2 Step 2
Sunday, March 18, 2012
Cyndi's Step 1
I started with two orphan blocks. The first was a Chinese Coins block that I made incorrectly - but couldn't just throw away. The other was a leftover pansy from Block Lotto.
A couple of slashes, insertion of some flowery strips, dividing the Chinese Coins, and adding a little striped fabric, and here we go!
Click to see other examples with this label:
Cyndi,
LibRR2 Step 1
Subscribe to:
Posts (Atom)