Showing posts with label LibRR1 Round 3 Rectangles. Show all posts
Showing posts with label LibRR1 Round 3 Rectangles. Show all posts
Friday, December 9, 2011
Thanks to June.....Rectangles
Thursday, December 8, 2011
And then the Rectangles
Well, I have tried and tried to upload the picture of this step/border. But I can't find it on my computer..... really, I think the picture fairy stole it. And I uploaded it to my Liberated Yahoo Groups folder, but it won't let me transfer it here. So you will have to imagine the last picture, now add in your mind brightly colored rectangles, approx. 2 1/2 in, by 4 to 6 in. all the way around the outside. That's it. Remember I said we are in the middle of the Christmas season? I was trying to keep it simple and get it done fast. But......next border may not show up for another 6 months. Since the element is curves, I decided to use Victoria at Bumble Beans blog method for doing curved piecing. Trying to mimic the streamers in the other fabrics. Well..... at this point I'm not sure how successful the technique is working for this project. But I REFUSE to applique! Just sayin', I know that would work and give me beautiful curves, but not doin' it! :)
Monday, September 19, 2011

A little progress at last!
I'm not sure what step I'm up to, but I've had fun today playing with my round robin. This is my first attempt at liberated letters and I'm quite happy with them. Thanks Nancie for all the hints I found in your previous posts about this.
I'm thinking of filling the gap under the letters with strings and then maybe making a border all round with the green batik. Then I'll face the curves!
Tuesday, August 16, 2011
Rounds 3 Letters & 4 Circles
And not necessarily in that order. I think I have completed 3 & 4, but I keep seeing just one more spot that could use another circle. The size now is about 22 wide by 26 high. I had a lapse of about 4 weeks from sewing while I removed wallpaper and painted my studio. I have posted photos of the rehab over at my blog at http://judyspod.blogspot.com/ I really am unable at this point to explain how all these things came together, which I guess would be why it is called a Round Robin!

Monday, August 8, 2011
Rectangles = Letters!

I am becoming SO liberated! I had never even considered letters on a quilt but I am so inspired by everyone here and so made my rectangle "row" about letters.
This is all so timely. I am making this quilt just for me and have a lot of bicycling imagery as I love bicycling and do it a lot. Just at the time I decided to catch up with everyone else I found my new bike - it's pink!! I have not had a brand new bicycle since I was a kid. My current bike is 15 years old. It works but new bikes have EVOLVED! I am so excited about this bike that I am dreaming about it. So my dreams leaked out and onto the quilt!
My goal is to be caught up with the challenge before the next round is announced. My piece is now 43" square.
Saturday, August 6, 2011
Reflecting Pool–Round 3
Well, I had my Round Robin piece up on my design wall, but didn’t like anything I tried with it. I even sewed some to it, but then took it out. I tried it lop-sided, wonky, and any way I could think of. Finally, I got disgusted, took it down and shoved it in a box. That took from my last post (way back when) until just today when “Eureka!” I suddenly knew what my problem had been: me. It’s not that what I had didn’t work, it’s that I was trying to make it conform to my preconceived pattern idea. I’d forgotten what I said in my first post: The colors are wild. Yes, indeed, they are. This quilt is all about color pattern. Soon as I remembered that, ideas just jumped together. This is the Round 3 Rectangles (large, small and all sizes).

Got it. Remind me of that first posting again next time I get stuck, will you please?
-Wendy

Got it. Remind me of that first posting again next time I get stuck, will you please?
-Wendy
Thursday, July 28, 2011
Me and You: True Blue

Sunday, July 24, 2011
Round 3 Strips

I had a long band of red and white strips that were left over from an earlier project. I had sewn the little pieces together as Leaders and Enders during that project, and the band was in my Orphan Box. I added a ticking strip on each side.
Altogether it was long enough for two sides, contiguous or the two short sides. This is the choice I made.Current size is 25" X 43".
Sara
Friday, July 22, 2011
Round 3 Rectangles
Finally! I've been thinkin' and thinkin' and the result just looks so easy, but I had to get to a place where I could "cogitate" about the colors. I wanted more lights and I picked a few at a time. I was thinking I might want to make it into a curve and now with round 4: curves, I may just do that. But before I do, I must practice.
There's a bit of a stretch through the middle, that I hope won't interfere with the quilt when I quilt it.
 I think batiks stretch a bit more than other fabric when sewing them and the border is already curved a bit! LOL! :) http://pattilousquilts.blogspot.com/
There's a bit of a stretch through the middle, that I hope won't interfere with the quilt when I quilt it.

Monday, July 18, 2011
Round 3!
Busy busy here in the land of garlic, cheese and red wine!
I give you my Round 3

It's looking a lot better now that I've added the blue piano keys and another wide black border.
This is getting big - and I mean big! It's covering up my Haunted Houses quilt which was big enough.
I give you my Round 3

It's looking a lot better now that I've added the blue piano keys and another wide black border.
This is getting big - and I mean big! It's covering up my Haunted Houses quilt which was big enough.
Saturday, July 16, 2011
Round 3
 I tried several options, and finally decided the two borders (rectangles) looked best with the fabric I used with the flying geese. As busy as the fabric is, other options looked disjointed.
And I do love the fabric. :)
Wednesday, July 13, 2011

Saturday, July 9, 2011
Jan Round #3 Rectangles

Thursday, July 7, 2011
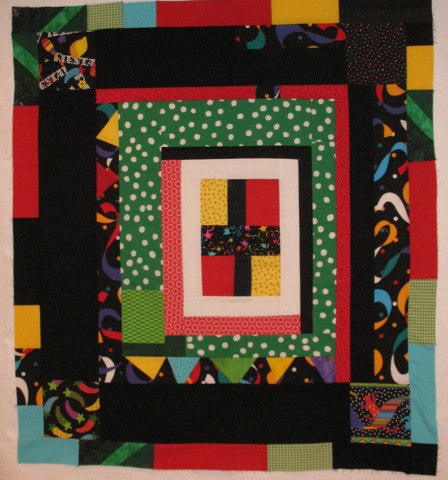
Round 3 Rectangles
Hi, here's the simple construction I promised :-)

and here's what's left of the border fabric :

I think even the small dark blue stripes are rectangles and you can consider this as a big log-cabin block ;-)
The fabric of the wider log came through our ww-swap into my stash, it's from Kathy and I think it's just perfect . And now it's gone, sigh .
Still having fun with the RR
Heidi
Tuesday, July 5, 2011
Round 3: Rectangles

I surprised myself by completing Round 3 so quickly by using strips for a slanted border. I cut a piece of thin scrap fabric, 5" wide by the length of the quilt to use as a foundation for the strip piecing, then stitched the strips at a 45 degree angle. I made 2 of these and planned on making 2 more for the round 3 borders. Then....a little laziness crept in. I wondered, "How would this border look if I made it 2" wide instead of 4.5" wide? So I cut each of the 2 strip pieced borders in half lengthwise, and I had 4 borders for round 3.
Auditioning fabrics for a plain border before round 3 wasn't working; nothing looked right. So another quick decision was made: Cut strips of various brown fabrics and stitch them to the quilt in log cabin fashion. My quilt is definitely ready for a wide border in Round 4, so that it will grow to be a lap quilt. It's now 42" x 42".
Monday, July 4, 2011
Round 3: A theme emerges!
As I look at my quilt I see a theme recurring quite unintentionally...at least consciously..evidently it's all about the circles!
Isn't liberated/improvisational quilting exciting? The quilts are infused with the makers' intuitive reactions to color, shape, size, balance, pattern...
![]()
The Liberated Round Robin project is so satisfying...quilts incubating and emerging little by little...it's tantalizing..no wonder we love it so! A journey undertaken with not as much thought given to the end, as the complete enjoyment of the process. It is the journey..not the end that is so wonderful! Perhaps my quilt shall be named Zen!
Isn't liberated/improvisational quilting exciting? The quilts are infused with the makers' intuitive reactions to color, shape, size, balance, pattern...

Rounds 2 and 3!
 I left town to go to my stepson's wedding and you guys did Rounds 2 and 3! I had to play catch-up. Round 2 was squares. Hmmm...my squares are log cabins and I tried putting them around the triangles, but the design was less than pleasing, so I took out some of the triangles and installed log cabins. Then I decided it needed a border and Round 3 was strips. How fortunate. So a mostly blue, some green, and a little pink piano key border was next. It's the start of a happy quilt, but it's getting big, it's 31" x 44" now. How long are we doing this? And what am I going to do with all those little left-over log cabins???
 Sunday, July 3, 2011

Friday, July 1, 2011
LibRR1 Round 3: Strips, Strings and Rectangles
Make one or more borders using these elements. Run them horizontally or vertically; make wonky log cabins or string blocks; cut stripsets into other shapes; or add liberated letters.
Remember that squares are also in the rectangle family....try liberating Bargello, Irish Chain, or Trip Around the World blocks, to name a few.
Add plain borders as needed to make your quilt visually pleasing.
Added July 5th by JD: Please include the measurements of your project in your post and double check the Who We Are page to be sure the correct information is included for you!
Added July 5th by JD: Please include the measurements of your project in your post and double check the Who We Are page to be sure the correct information is included for you!
Subscribe to:
Posts (Atom)