
Saturday, April 28, 2012
Round Three
Friday, April 27, 2012
Liberated Round Robin 2 Step 3
LibRR2-3
WOW! Liberated quilters you are doing wonders already with color! Color is my addition to the challenge. But, after looking at the the entries so far, I see so much fun use with color that I doubted a bit at what I could add. Soooo, I went to my Gwen Marston books. Let me share with you some of what she has written about color in Liberated Quiltmaking and as she reiterated in her Liberated Quiltmaking II, p. 9
“ *You don’t need to choose all the colors before you start sewing.
* Consider adding accent colors.
*Trust yourself when choosing colors.
*It’s harder to make a mistake than you think.
*It’s easier to err by playing it too safe: over coordination can lead to the “color by number” look and a monotonous quilt.
*The more fabrics you use in a quilt, the less important each specific fabric becomes.
*Sometimes one color will help unify a quilt.
*Study other quilts for color ideas.”
So with that in mind, I’d like you to look at how you’ve used color so far. Does your piece need a unifying color? Some call it neutral, but we’ll skip that term as theories are just theories. Maybe you have a favorite color you’d like to add. I’ve joked about Lime being my new neutral. Maybe you’d like to spice it up with black and white as Gwen and Freddie have done in many quilts in Collaborate Again.
There’s always grey, beige and even purple tones that can be added. Don’t stress too much about this portion. Now’s the time to whack it apart a bit more, or for those of you that don’t want to whack any more, add a new color. For those of you who have parts saved, figure out what color/colors you can now add and then assemble them all into one main block and await next month’s challenge.
So to review, you’ll be accenting or unifying your quilt this month with COLOR.
You’ll be assembling any spare pieces you have and adding them with color to make ONE piece--
above all, have more fun as you seem to have been doing already.
http://gwenmarston.com/books/books.htm will give you some visual stimuli from Gwen.
Thursday, April 26, 2012
Eddie's Round Two

First I went through my scrap basket looking for brights & made some small crumb blocks which I arranged around my round one block.

Since June asked...
This is the back of my LRR

I had ordered the yellow online last spring and when it arrived I couldn't use it as planned and besides I didn't like it and it moved into my stash. But now I was pleased to find, here it fits perfectly. So hurray to a good stash :-)
And thank you for all the nice comments !
Heidi

I had ordered the yellow online last spring and when it arrived I couldn't use it as planned and besides I didn't like it and it moved into my stash. But now I was pleased to find, here it fits perfectly. So hurray to a good stash :-)
And thank you for all the nice comments !
Heidi
Tuesday, April 24, 2012
Not a Happy Bunny
I'm not happy with the original block and the crumbs so I'm starting again.
I've got some batik blocks left over from a previous quilt so I'm starting again with those. I shall probably be a round behind, but that's got to be better than my initial decision which was to leave in a fit of pique!
I don't like the original idea, it won't lie flat and the green really jumps out.

I'll probably slash it and use it in something else.
Monday, April 23, 2012
A Great Revelation
So here is a quilting truth: if you start with colors that clash, you get an ugly block with clashing colors, and if you sew those blocks together, you get a quilt with ugly clashing colors. Well, duh!! So just STOP!
And that's what I did. The square I started with for Round One was made of scraps as a prototype for a pattern I was testing. I made no effort to match colors and the resulting block is abominable (though the pattern is great.) Slashing the ugly block apart, adding more scraps, only made a slightly more complicated ugly block. And as for crumbs? Well, I made some nice dots in various sizes from assorted scraps -- but they didn't coordinate with that ugly center square. So today I made blocks with more crumbs from exactly those same ugly colors -- and I still don't like them!
So now I'm going down a different road. The only other "orphan blocks" I had were some fabric postcards that didn't work out. But they did match my dotty crumbs. So, without a clue as to what I might be doing, I trimmed the shoddy satin-stitched edges from the postcards and framed with them with black strips.
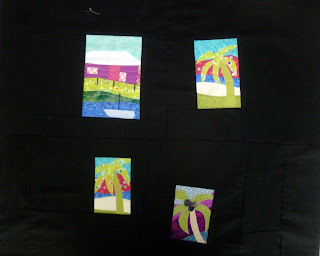

And now I'm playing around with dots, first just random placement but am now thinking I like overlapping better. They're not sewn down yet -- I can play some more tomorrow. So, here I am, wandering down another road, wondering where I'm headed.
Mary in Panama
Sunday, April 22, 2012
Round Two Done
Well, I didn't wait to see if there were going to be any suggestions.....I just went ahead and did what I wanted - and then finished the for crumb borders ~ Ready for Round Three!
 ............. and one poor little left over block............
Leanne
http://hawaiiquiltsandlife.blogspot.com/

Leanne
http://hawaiiquiltsandlife.blogspot.com/
An Old Block


LibRR 1 - a finish
Hi,
I finally finished LRR1 and I like it . It's mostly machine quilted, but I outlined the circles and triangles by hand.

It's called 'Red Dot'... maybe you find the explanation on this quilt ;-)
As I have too many UFO's , I didn't joint this round, but I can see, how much fun you have !
Heidi
Saturday, April 21, 2012
Round Two
OK ~ So I am working on my Crumb Round.......


So ......any ideas?
Leanne Clare
http://hawaiiquiltsandlife.blogspot.com/
Tuesday, April 17, 2012
I'm Really Not Sure Where I'm Going
I've got some crumbs going--and I've got more. It's just that I'm not sure how I'll unify all that I have.
 I found this cute little block in my crumbs drawer. I don't know yet, if I'll use it, but I'm not discounting it as a possibility, not just yet, anyhow.
I've not cut any crumbs to specific sizes yet either, as I don't know how I'll put them together. For now they are on the design wall waiting for some inspiration. I've pulled a couple of strips that were in the drawer too. They may or may not be used.
 Wow! They really need some color to unify or define them. Maybe they'll just go back into the drawer! Some sort of definition is needed! Just a bit of my hand dyed blue is left, so I'm not cutting into it yet. Is this how liberation works? Boy, compared to some others, this really looks like a mass of something--don't know what I'd call it. I'll just let it incubate and make more crumbs!
a few minutes later...
a medallion perhaps?


I've not cut any crumbs to specific sizes yet either, as I don't know how I'll put them together. For now they are on the design wall waiting for some inspiration. I've pulled a couple of strips that were in the drawer too. They may or may not be used.

a few minutes later...
a medallion perhaps?

Monday, April 16, 2012
Step 2 Ready and Waiting
I found some additional feed sack fabric and decided for my Step 2 to make a piece of cloth from the feed sack crumbs. My fabric measures 6 x 7 1/2". I'm not sure if it will triangles, stars, squares or strips or ?????. So, I've decided to wait for Step 3 before I put things together. But I know for sure when this little LibRR2 quilt is finished it will be donated to Ami Simms for the Alzheimer's Art Quilt Initiative. AAQI quilts must be no larger than 9 x 12 inches. This will be a true mini.


Sunday, April 15, 2012
LibRR1 It's a Winner
With much encouragement from my hubby, I entered a Quilt Show that was held yesterday. The show was held in East Perry County in Southeast Missouri. This is 30 miles north of Cape Girardeau where my hubby grew up and where we lived for 11 years. Anyway, he liked "Dogs & Dots" from our First Round Robin. So I entered not thinking anything would happen other than us spending a wonderful Saturday looking at quilts in the various venues of this historic area and attending a Bed Turning by Ann Hazelwood What a surprise.
"Dogs & Dots" won 2nd place in the Art Innovative Wall Quilt Category.
 Thanks everyone who participated in creating LibRR1 and I know we have some winners developing in LibRR2, too.
"Dogs & Dots" won 2nd place in the Art Innovative Wall Quilt Category.

Thursday, April 12, 2012
Crumbled cropped Blocks
.JPG)
Aw Stripes and mixes, the middle was already made up into a large block just waiting for a reason to be
.JPG)
The Chequered centre and liberated surround just 'happened', no inspiration what so ever apart from finding loads of bits in my celebrations tin that I had 'filed' away for a rainy day - and thus totally forgot I had them :-)
The next round is eagerly awaited and fingers crossed I won't get all cuffuffled and muddled when it comes to posting the pictures and text onto the blog.... oh well its late here and my daughter celebrates her 12th birthday today too... early morning and late night for me then - plus the mid night feeds from bubba boy.... ahh at least my blocks keep me going (blocks not blokes)
Step 2 - Where are the Crumbs?
To be honest, I don't have much in the way of crumbs. I have alot of strips of various widths and some odds and ends, but little pieces of fabric don't stay in my sewing room. I donate them to be stuffing for cat beds. I'm serious. I'm not making it up! One of the members of the Bay Area Modern Quilt Guild is a volunteer at a no-kill shelter for stray cats. Each new owner of a cat gets a bed. My crumbs go to her initially and then ultimately to a new cat owner.
So, as I contemplated what I would do for Step 2, I went to strips. I started out with a bunch of strips and left over cuts from other projects and made this:
 I cut the new fabric up into 4 strips to add to my center block.
 After I added the borders, I noticed how the red pick-up sticks shifted the focus of the center block to the right. Which caused me to want to continue that concept in the new border, so I retro-fit a grey pick-up stick into the new border. I wish I would have known I was going to do this before I sewed on the borders - it would have been so much easier to do at that stage.
 I may add a grey pick-up stick in the top border, but I'm going to study this for awhile. At least it won't involve another corner retro-fit!
I don't think my strips have resulted in a very liberated step 2 as compared to what others are doing, but I am satisfied with my composition and most importantly, I'm enjoying the process.
I look forward to seeing all the other step 2 posts.
So, as I contemplated what I would do for Step 2, I went to strips. I started out with a bunch of strips and left over cuts from other projects and made this:


I don't think my strips have resulted in a very liberated step 2 as compared to what others are doing, but I am satisfied with my composition and most importantly, I'm enjoying the process.
I look forward to seeing all the other step 2 posts.
Tuesday, April 10, 2012
Step two progress
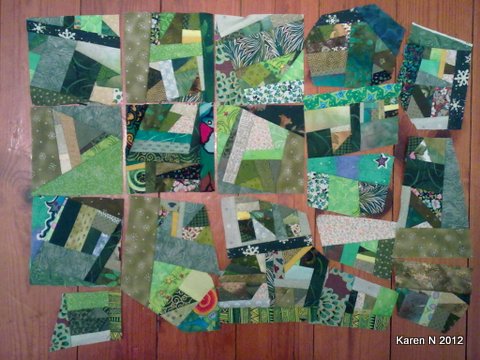
Thank goodness for a four-day weekend! Sewed like crazy for two evenings creating green fabric - all to show is 7 x 4.5" squares and smaller pieces of made fabric, interest waning a bit... because I can't think what I will do with them, and surely will need lots more....

Saturday, thought that maybe I should not make fabric from such small pieces, start with longer strips, pull all the lilac strings and ... yay! in 15 minutes flat had stitched and cut these 3.5" pieces. A border later?
 Monday morning, so enthused with that turn around, I wanted to do something with red, and found in the red box all the left over string pieces from Orca Bay (mostly the triangles I cut the wrong way, because not paying attention!), Ok... seeing I'd added the turquoise slash, picked some 4.5" squares with turquoise and made these half-square triangles (hmm... more scraps for later!) Various sizes... but at this point no idea how they'll get used!

Maybe should try again with the greens, using strings, and ended up making this, thanks to Anna's blog. Again perhaps should have had wider pieces, as it took all evening. It's about 14" x 16". It looks better in the photo than in real. But I could cut it up later!

So tonight, what to do, what to do?... then saw what Margaret had said about containing her orange... think I know what, add a border...

... and I think (see, not stitched yet..) this might work...

Or go off on a complete tangent!
Saturday, thought that maybe I should not make fabric from such small pieces, start with longer strips, pull all the lilac strings and ... yay! in 15 minutes flat had stitched and cut these 3.5" pieces. A border later?


Maybe should try again with the greens, using strings, and ended up making this, thanks to Anna's blog. Again perhaps should have had wider pieces, as it took all evening. It's about 14" x 16". It looks better in the photo than in real. But I could cut it up later!

So tonight, what to do, what to do?... then saw what Margaret had said about containing her orange... think I know what, add a border...

... and I think (see, not stitched yet..) this might work...

Or go off on a complete tangent!
Step II: Mary's Gone Dotty!
In the bottom drawer of my sewing desk, I found some plastic templates. I
bought them at least 15 years ago, thought they looked like a handy trick. Never used them even once. I had
just pieced together a bunch of crumbs, was pondering what they might become, and
next thing you know, I've put stabilizer on the back of this new fabric
and cut out a few dozen dots, ready for applique.

What are they? Bubbles? Balloons, maybe? What will they be appliqued to? I dunno!!! I'm just waiting wait for directions for Step III and maybe something will happen to connect my dots! Hmmmmmm....
Mary in Panama
Monday, April 9, 2012
First Two Steps - Margaret
Hi there! I'm a bit late getting started, but jumping in anyway. Dug up some strips I'd made as part of a Shop Hop quilt in 2001! Each of the 10 shops had designed a strip. After 3 strips I got bored and didn't want to waste any more time on it. Here are the three strips.


I decided to use the middle strip to begin with. Parts of the others might join in eventually. We'll see. So here's how those blocks went together after they were liberated from the strip, chopped up, and stitched back together freestyle.

Stuck with purple for the Round 2 crumbs. Since the middle was already pretty crumb-ly,
I tried to contain it with a small orange strip but added a few orange teeth in the border just for fun.
Waiting on Round 3 to trim it up. Can't wait to see what's next!

Janet's Round Two

This was the way the block stood at the end of round 1. I liked it well enough.
For round two, I started to make scrap fabric. I really love to do that. I use that techniques as leaders/enders sometimes. Anyway, I thought I would use the pink, black and yellow, which came originally from the Block Lotto stray flower, as accent colors. I thought for this round I would use the yellow. So I started about 6 little scrap fabrics with small pieces of yellow. Then I grabbed scraps in blues and blue-greens mostly. After a while, I sewed my 6 pieces together and cut a nice strip and experimented with adding the strip to the sides of this block. What I found was the pink was too strong and the "medallion" look was not doing anything for me. So......I cut the pink border in half, grabbed two more of my liberated stars and added the borders to three sides of the original block and this is what I came up with.

I think I like it. This process is so interesting as it is always evolving and nothing is set in stone. I still have two more stars, some more made fabric, and scraps of pink and black, if I need them. Can't wait to see what round 3 brings.
A Change in Direction
I knew it! I did tell you didn't I.
They have taken on a mind of their own!

Another quilt in the making!
So on to Plan B

Scrappy Sawtooth borders.
They have taken on a mind of their own!

Another quilt in the making!
So on to Plan B

Scrappy Sawtooth borders.
Sunday, April 8, 2012
My second round

Round 0ne wasn't looking liberated enough so I cut it into 4 parts then sewed it back together. Then I had some old blocks that I cut into 3 inch strips for my next round.

My Second Round
I'm having fun and I have a horrible feeling these crumb blocks are going to turn in to a quilt by themselves.

I'm not too sure where they are going at the moment.
I'm leaning towards slashing the first block diagonally (top right to bottom left), doing black borders round each half and inserting crumbs between the diagonals and round the outside.
What do you think?
Clare

I'm not too sure where they are going at the moment.
I'm leaning towards slashing the first block diagonally (top right to bottom left), doing black borders round each half and inserting crumbs between the diagonals and round the outside.
What do you think?
Clare
Saturday, April 7, 2012
Cyndi's Step 2
Remember this step 1?

 I hung it up on my design wall, and every time I looked at it, I liked it less and less. I know that putting slashes through blocks was what we were supposed to try, but this just looked like a pansy with a slash through it. I really liked what Janet did with her pansy - she cut it in four pieces, and stuck a different block in the middle, so the pansy almost disappeared.
So today I decided to separate the pansy a little.
 So this is my re-do of step 1.
Next, I tackled step 2. I had lots of already-made crumb fabric. I added a little more of the black/dots fabric, and cut strips of the made fabric for borders around it all.


So today I decided to separate the pansy a little.

Next, I tackled step 2. I had lots of already-made crumb fabric. I added a little more of the black/dots fabric, and cut strips of the made fabric for borders around it all.

Friday, April 6, 2012
LibRR2 Step Two
Hola, y'all great Liberated Quilters around the world!
Mary here, in Panama, but North Carolinian to the bone! And I am honored to offer you the next step in your Liberated Round Robin II quilt project. It’s just wonderful seeing all your creativity shining in Step 1 and promises to be even more fascinating as we watch each Liberated piece evolve.
You got crumbs, right? I got crumbs, for sure! It's a safe bet that all quilters the world over got crumbs! We're talking about those little bitty pieces that pile up in boxes and baggies and in the floor under your sewing table because you simply can't bear to throw them away. But they just aren't big enough to make a single flying goose or even a log for a cabin. Do you recall how much you paid for the yard of material that little scrap came from? Well, we're gonna put those crumbs to work; we're gonna make brand new fabric out of them and it will be worth even more than what you paid for the original yard!
To get you started, you'll find below some great links below to easy ways to put those crumbs together. Be sure to look at Bonnie Hunter's link as she is the Queen of Crumbs!
Now, here's the fun part: once you have your crumb fabric made, you can make it into anything your little heart desires. Cut your new fabric into squares and triangles and circles and then piece the pieces into something else. Square blocks are lovely, but you can do lots more: borders, flying geese (either the center triangle or the outer triangles -- or take turns!), churn dashes, wonky stars or trees, baskets, words, spikes, appliqued chickens or cats or chipmunks -- really, anything at all!
Here's a photo of a crumb border and small "Liberated Quilt" that I made:
Once you get your fabric made and then make a few blocks or border strips and post photos for all of us to see, you can take a break until April 27th since, for this Liberated Round Robin II, we're going to wait until then for further instructions.
Hmmm, what can be next?? Of course, rather than taking a break, you might just find that you are hooked on making new fabric from your crumbs:)
Go for it! Have fun! And as Clare reminds us:
Mary in Panama
Links to Help You with LibRR2 Step Two:
Bonnie Hunter:
http://quiltville.com/crumbs.shtml
Sunnie at Patchwork Pie who calls it Mile- a-Minute:
http://patchworkpie.blogspot.com/2008/06/mile-minute-quilt.html
Patti at Quilting is Still My Passion offers a great photo tutorial:
http://quiltingisstillmypassion.blogspot.com/2007/07/mile-minute-blocks-photo-tutorial.html
Mary here, in Panama, but North Carolinian to the bone! And I am honored to offer you the next step in your Liberated Round Robin II quilt project. It’s just wonderful seeing all your creativity shining in Step 1 and promises to be even more fascinating as we watch each Liberated piece evolve.
You got crumbs, right? I got crumbs, for sure! It's a safe bet that all quilters the world over got crumbs! We're talking about those little bitty pieces that pile up in boxes and baggies and in the floor under your sewing table because you simply can't bear to throw them away. But they just aren't big enough to make a single flying goose or even a log for a cabin. Do you recall how much you paid for the yard of material that little scrap came from? Well, we're gonna put those crumbs to work; we're gonna make brand new fabric out of them and it will be worth even more than what you paid for the original yard!
To get you started, you'll find below some great links below to easy ways to put those crumbs together. Be sure to look at Bonnie Hunter's link as she is the Queen of Crumbs!
Now, here's the fun part: once you have your crumb fabric made, you can make it into anything your little heart desires. Cut your new fabric into squares and triangles and circles and then piece the pieces into something else. Square blocks are lovely, but you can do lots more: borders, flying geese (either the center triangle or the outer triangles -- or take turns!), churn dashes, wonky stars or trees, baskets, words, spikes, appliqued chickens or cats or chipmunks -- really, anything at all!
Here's a photo of a crumb border and small "Liberated Quilt" that I made:
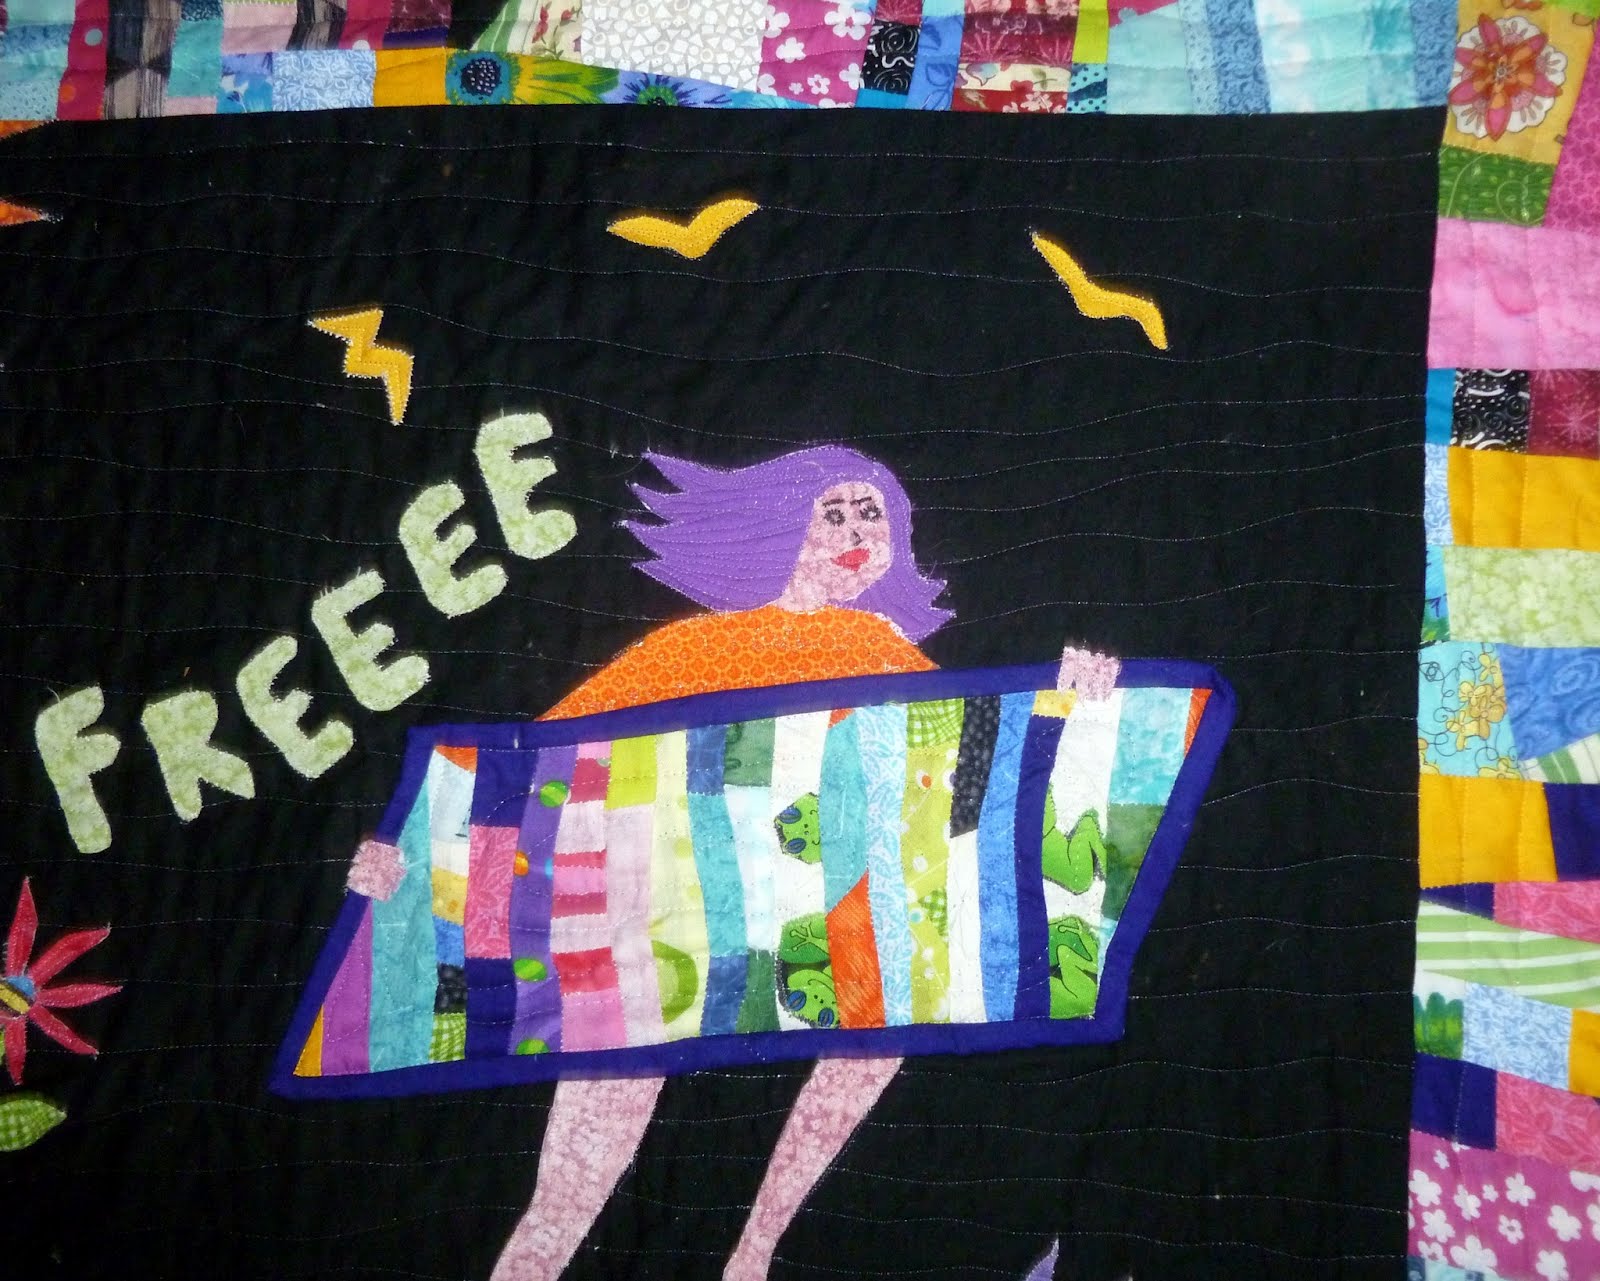 |
| Example showing one way of using crumbs in a quilt |
Once you get your fabric made and then make a few blocks or border strips and post photos for all of us to see, you can take a break until April 27th since, for this Liberated Round Robin II, we're going to wait until then for further instructions.
Hmmm, what can be next?? Of course, rather than taking a break, you might just find that you are hooked on making new fabric from your crumbs:)
Go for it! Have fun! And as Clare reminds us:
If it's not big enough, add something (a crumb?)
If it's too big, whack something off (voila, a crumb for another block!)
Mary in Panama
Links to Help You with LibRR2 Step Two:
Bonnie Hunter:
http://quiltville.com/crumbs.shtml
Sunnie at Patchwork Pie who calls it Mile- a-Minute:
http://patchworkpie.blogspot.com/2008/06/mile-minute-quilt.html
Patti at Quilting is Still My Passion offers a great photo tutorial:
http://quiltingisstillmypassion.blogspot.com/2007/07/mile-minute-blocks-photo-tutorial.html
Wednesday, April 4, 2012
Round one LibRR2

I decided to use this block for my first round and liberate it. I made this block at a workshop last summer which I attended with my daughter and a good friend. I was testing color options. I like the brights with the black background, but only had enough of the focus fabric for two blocks.

First I added some solid inserts

Decided it needed something else so added the black and white inserts. I have to admit that I have been looking at every one's posts as I originally had no idea how to go about "liberating" my block!
Looking forward to seeing what is next as this is my very first Liberated Round Robin.
Eddie
Tuesday, April 3, 2012
LibRR2 Step One by Jody B
 |
| LibRR2 Step One by Jody B |
i was going to slash a couple of pineapple blocks but where do you slash a pineapple block --- too many seams. so i made a large simple black and white block and slashed it, inserting primary colors. i'm happy with it.
Jody B
Monday, April 2, 2012
Link: with LibRR2 Step One Inspiration
Nann from Lib-Quilters shared a link today that goes right along with Step One of LibRR2 - http://waynekollingersquiltblog.blogspot.com/
Very interesting ideas!
Very interesting ideas!
If you haven't posted your step one for LibRR2, hope you will have time to do it before step two is posted this Friday!
Break thru the feeling it has to be perfect and join in!
Break thru the feeling it has to be perfect and join in!
LibRR2 Step 1 - Kathleen
Hi everyone,
I'm Kathleen, living in Los Altos, California (on the peninsula in No.Cal, south of San Francisco and north of San Jose).
This looks like a fun experience and I look forward to learning alot in the creative process.
Not really knowing what I am doing, I took a block from my reject pile, and tried to liberate it. Unfortunately, as you will see, the structural problem with this block (failure to make beautiful points on the center diamond) continues with this exercise (humbling as it is, I decided to keep it).
I started with this:
 I took the first cut:
 Then got in the spirit and added more "pick up sticks":
 This is my end result for my center block:

Having looked at some of the other blocks, I realize that I should have considered cutting the block up and rearranging, rather than just cutting up and adding my "pick up sticks". Or I could have put the block back together in a little less precise manner.
That being said, I am growing to like this block and hope that I will be able to add other elements as we progress through the rounds. And learn from the entire experience...
I look forward to sharing in your creative process as well as learning from each of you. Please feel free to access my blog at: http://www.californiadoodlesanddesigns.blogspot.com and join as a follower. I would so appreciate it!
I almost forgot, my log on name is "Cakath". Look forward to sharing with each of you.
I'm Kathleen, living in Los Altos, California (on the peninsula in No.Cal, south of San Francisco and north of San Jose).
This looks like a fun experience and I look forward to learning alot in the creative process.
Not really knowing what I am doing, I took a block from my reject pile, and tried to liberate it. Unfortunately, as you will see, the structural problem with this block (failure to make beautiful points on the center diamond) continues with this exercise (humbling as it is, I decided to keep it).
I started with this:


Having looked at some of the other blocks, I realize that I should have considered cutting the block up and rearranging, rather than just cutting up and adding my "pick up sticks". Or I could have put the block back together in a little less precise manner.
That being said, I am growing to like this block and hope that I will be able to add other elements as we progress through the rounds. And learn from the entire experience...
I look forward to sharing in your creative process as well as learning from each of you. Please feel free to access my blog at: http://www.californiadoodlesanddesigns.blogspot.com and join as a follower. I would so appreciate it!
I almost forgot, my log on name is "Cakath". Look forward to sharing with each of you.
Subscribe to:
Posts (Atom)