Friday, December 9, 2011
Thanks to June.....Rectangles
Thursday, December 8, 2011
And then the Rectangles
Well, I have tried and tried to upload the picture of this step/border. But I can't find it on my computer..... really, I think the picture fairy stole it. And I uploaded it to my Liberated Yahoo Groups folder, but it won't let me transfer it here. So you will have to imagine the last picture, now add in your mind brightly colored rectangles, approx. 2 1/2 in, by 4 to 6 in. all the way around the outside. That's it. Remember I said we are in the middle of the Christmas season? I was trying to keep it simple and get it done fast. But......next border may not show up for another 6 months. Since the element is curves, I decided to use Victoria at Bumble Beans blog method for doing curved piecing. Trying to mimic the streamers in the other fabrics. Well..... at this point I'm not sure how successful the technique is working for this project. But I REFUSE to applique! Just sayin', I know that would work and give me beautiful curves, but not doin' it! :)
Next up: Squares

A Little Progress....

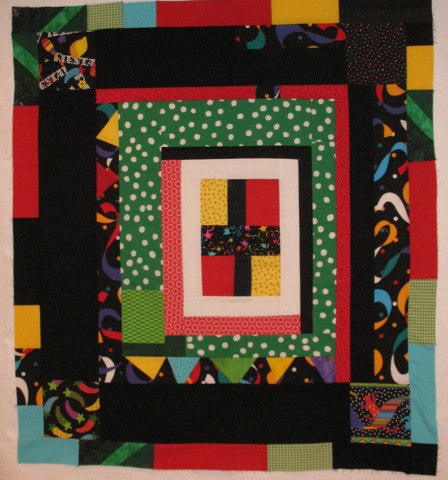
Latecomer to the Round Robin Party
 Jo in PA here.
Wow, I can't believe I am this late getting to the Round Robin party.
Maybe I will get the booby prize. Oh, well, better late than never. I had good intentions of starting this way back when the idea was first proposed. But it is easier to think about sewing than it is to actually DO it. So this was in my head and I even started the center block, and then..... got stuck.
So fast forward 6 months and progress occurs!
Saturday, November 26, 2011
Colours of Life

Didn't finish it as it was getting too big to do squiggles.
It was my Mother's 80th birthday party last week. I was going back to the UK for it and needed something to give her.
She's been on at me for ages to make her a lap quilt to keep her knees warm so I pulled this out, took a deep breath and machine quilted it. Just straight lines, using 1" masking tape as a guide. Not bad for a first attempt!
Finished size approx 48" by 46".
Sunday, October 30, 2011
Funny You Should Ask!

So Where Are The Liberated Round Robin Participants?

Thanks!
Love, Pat--who has finished and given hers away. See my post here:
Monday, September 19, 2011

A little progress at last!
I'm not sure what step I'm up to, but I've had fun today playing with my round robin. This is my first attempt at liberated letters and I'm quite happy with them. Thanks Nancie for all the hints I found in your previous posts about this.
I'm thinking of filling the gap under the letters with strings and then maybe making a border all round with the green batik. Then I'll face the curves!
Sunday, September 11, 2011
Working on Phase 6


9/14 Quilting completed and ready for binding.

And then a close-up of the actual quilt.

It may be a couple of days before I can work on the completion of my quilt, but with someone expecting it. I'll get it done. Maybe even next week!
Sunday, September 4, 2011
LibRR1 Round 6: Ready to Use or Give Away
Change your project into a quilt! Make the sandwich and join it together and close it up!
Let us know what is going to happen to your project once it is completed!
Take pictures and share!
Round 6 is added so you can show your project after it's quilted, bound, and ready to use or give away!
(I misread the notes - this was supposed to be the ending step after embellishing and finishing up - June)
Monday, August 29, 2011
Dogs and Dots Final Round

This has been a great Round Robin. I had so much fun and it has been a real learning process for this Rookie. I do hope we do another one in the near future. Thanks so much for a wonderful experience!!
Saturday, August 27, 2011
Me and You: True Blue -- all finished!

Free Motion Quilting : done
Binding: done
Label on back: done
Hanging strip:done
Photos: done
So that's it!! My RR quilt is finished, ready to give to my friend when she arrives September 8. What an interesting project to start out not knowing more than that I would use the blue fabrics I had on hand. I liked the idea from Gwen and Freddy of 2 chickens representing them and their freindship. I actually made a few of Freddy's Chickens but did not like the fussiness of piecing them. So I just free-handed my own chickens, which turned into a couple of sassy wonky birds instead! Thanks, June and Nancie, for putting the RR together, keeping it all organized, and for your support along the way. It's been fun and I've got a quilt to give my friend as a bonus! Mary
Wednesday, August 24, 2011
A Good Time!
Thanks to June and Nancie for organizing our Liberated Round Robin. I've had a good time working on my quilt, and I learned some new things from making my quilt. It's been fun to see what everyone has done with their center square.
This morning I figured that I would call my quilt finished and tie it for a charity quilt, because I like some of the borders but am not crazy about the entire quilt. My daughter came to visit today, and just as she was leaving she saw the quilt on my design wall: "That's wonderful, Mom!" "Really, Libby? Do you want it?" The answer was "Yes, but could it be made bigger?", so now I'm motivated to add more borders and make it big enough for her to nap under.
It's good to remember that we all see things differently. I don't like the quilt's center square, yet my daughter told me it's just right, don't change a thing.
Again, thanks for our Round Robin.
Monday, August 22, 2011
LibRR1 Round 5: Embellish and Finish
Now is the time to add the finishing touches to your quilt.
Make it bigger or longer, if you wish.
Wrap up this gorgeous creation by adding whatever it needs!
And if it’s “just right” the way it is, rejoice!
Please post a photo of your project after you have adding anything new, along with notes so we can all learn from your process.
Label the post with your name and Round 5 Embellish and Finish, to show how you finish the top of your project!
Words by Nancie V, posted by June. Modified later by June
Tuesday, August 16, 2011
Rounds 3 Letters & 4 Circles
And not necessarily in that order. I think I have completed 3 & 4, but I keep seeing just one more spot that could use another circle. The size now is about 22 wide by 26 high. I had a lapse of about 4 weeks from sewing while I removed wallpaper and painted my studio. I have posted photos of the rehab over at my blog at http://judyspod.blogspot.com/ I really am unable at this point to explain how all these things came together, which I guess would be why it is called a Round Robin!

Saturday, August 13, 2011
Behind Schedule
I thought I would have Round 4 done quickly. My mind went to vines just as Heidi described. Then I talked all about easy curves, remember? Well I made some curves, discarded most of them, set the quilt aside, then decided on one curved border and three plain. But the borders aren't yet stitched. The style of my curved border doesn't seem to go with the rest of the quilt. I'll get back on track as soon as I can, though, and post a photo soon.
Thursday, August 11, 2011
Stuck
When I read the rules for round 4 I immediately had vines and leaves and flowers in my mind.
So I added another plain green border and positioned some vines on it and looked at it and looked at it ....and tried to see some leaves and flowers...no, I don't like this idea any more..
So now this piece already hangs for more than a week on the wall.
What I'll probably try this evening are some yellow circles in different sizes, dancing on the 2 borders. Maybe that will work..

Heidi
Monday, August 8, 2011
Round 2 Squares

Oops - I didn't post in order!
I went crazy making these squares. The idea was a square within a square and then it wasn't a good fit so I started just channelling Gwen and sewing scraps together. I really got into it! The new "fabric" I made was gorgeous. I also love the asymmetry.
I am constantly inspired by other members of this group and am loving the results of this exposure. Thanks to all!
Rectangles = Letters!

I am becoming SO liberated! I had never even considered letters on a quilt but I am so inspired by everyone here and so made my rectangle "row" about letters.
This is all so timely. I am making this quilt just for me and have a lot of bicycling imagery as I love bicycling and do it a lot. Just at the time I decided to catch up with everyone else I found my new bike - it's pink!! I have not had a brand new bicycle since I was a kid. My current bike is 15 years old. It works but new bikes have EVOLVED! I am so excited about this bike that I am dreaming about it. So my dreams leaked out and onto the quilt!
My goal is to be caught up with the challenge before the next round is announced. My piece is now 43" square.
Saturday, August 6, 2011
Reflecting Pool–Round 3
Well, I had my Round Robin piece up on my design wall, but didn’t like anything I tried with it. I even sewed some to it, but then took it out. I tried it lop-sided, wonky, and any way I could think of. Finally, I got disgusted, took it down and shoved it in a box. That took from my last post (way back when) until just today when “Eureka!” I suddenly knew what my problem had been: me. It’s not that what I had didn’t work, it’s that I was trying to make it conform to my preconceived pattern idea. I’d forgotten what I said in my first post: The colors are wild. Yes, indeed, they are. This quilt is all about color pattern. Soon as I remembered that, ideas just jumped together. This is the Round 3 Rectangles (large, small and all sizes).

Got it. Remind me of that first posting again next time I get stuck, will you please?
-Wendy

Got it. Remind me of that first posting again next time I get stuck, will you please?
-Wendy
Thursday, August 4, 2011
Oh, my Dyslexic Self!!! Or, at last I can see!
Finally, some curves I like!!

After ordering some fabric to make the border, I approached cutting the curves with lots of anxiety! I tried Debbie's http://stitchintherapy.blogspot.com/
directions as best I could. She suggested:
Wait don't panic....it looks very good. Don't add more purple, go with the dark green. Here's what I would do. Press as flat as possible--stray starch a lot--- and don't trim the purple. Cut strips of green at least 4 in wide. While flat, slide the green strip UNDER the purple edges--one at a time. Then cut thru both purple and green and do a very slight, gentle curve. This way you are assured of matching curves. Flip the green to top of purple, match edge and sew a very little at a time, stopping and aligning as needed. Or the other option is once cut...press under the cuved edge of the green 1/4" and topstitch to the purple. You can do this and make it spectacular.
So I tried cutting it this way:
 With the green underneath, I tried cutting both wrong side and then right side. You guessed it the curves ran the same way and didn't fit into each other!!! Oh my, why couldn't I "see" that!
Then I tried it this way---running out of fabric here (panic, panic)
 Ah, ha! It fits snugly and the resulting sewing it together WORKED!!!
I've trimmed it now, and hope I didn't take too much off the sides, as I don't know what the next round of the liberated challenge will be. But, at last, I am satisfied!!! I'm liking it! http://pattilousquilts.blogspot.com/

After ordering some fabric to make the border, I approached cutting the curves with lots of anxiety! I tried Debbie's http://stitchintherapy.blogspot.com/
directions as best I could. She suggested:
Wait don't panic....it looks very good. Don't add more purple, go with the dark green. Here's what I would do. Press as flat as possible--stray starch a lot--- and don't trim the purple. Cut strips of green at least 4 in wide. While flat, slide the green strip UNDER the purple edges--one at a time. Then cut thru both purple and green and do a very slight, gentle curve. This way you are assured of matching curves. Flip the green to top of purple, match edge and sew a very little at a time, stopping and aligning as needed. Or the other option is once cut...press under the cuved edge of the green 1/4" and topstitch to the purple. You can do this and make it spectacular.
So I tried cutting it this way:

Then I tried it this way---running out of fabric here (panic, panic)

I've trimmed it now, and hope I didn't take too much off the sides, as I don't know what the next round of the liberated challenge will be. But, at last, I am satisfied!!! I'm liking it! http://pattilousquilts.blogspot.com/
Monday, August 1, 2011
Curvy Joy

My Curves are pieced together using the mirror method (cutting curves in two pieces of fabric and putting the mirror images together by machine) and then I added 3 oddly curved shapes and button hole stitched around them. I only put them on the bottom of the piece because it is getting big... I added narrow strips on the other sides to separate the piano keys from the next step. Onward!
Sue in Mi http://suesjourneys.blogspot.com/
Saturday, July 30, 2011
Jan---Round 4 Curves

Friday, July 29, 2011
curves!

Hopefully with the last round I can pull it all together!
Thursday, July 28, 2011
Me and You: True Blue

Tuesday, July 26, 2011
Curves, hmmmmm . . .
 I hope my little circles will count for my curves. The star is a half circle that I inset, but it doesn't show. Actually the star was a circle, but I liked the look of the half circle sitting on the rectangle. It still looked a little static to me so I added the little circles to add movement and to encourage the eye to look for all the other dots and circular curvy things. The size is about 31" by 24".
.
Monday, July 25, 2011
June's Lib RR Round Two - Squares

I was going to put the squares at different angles, but decided to keep them oriented so they are all at the same - but they show movement by where they are in the distance from the triangles and distance from each other.
This piece is now 30" x 31" - I'm probably going to trim it so it's square.
Either before or after my round three (rectangles), I'm going to add something to make this so it's more lap sized....
Sunday, July 24, 2011
Round 3 Strips

I had a long band of red and white strips that were left over from an earlier project. I had sewn the little pieces together as Leaders and Enders during that project, and the band was in my Orphan Box. I added a ticking strip on each side.
Altogether it was long enough for two sides, contiguous or the two short sides. This is the choice I made.Current size is 25" X 43".
Sara
Friday, July 22, 2011
Round 3 Rectangles
Finally! I've been thinkin' and thinkin' and the result just looks so easy, but I had to get to a place where I could "cogitate" about the colors. I wanted more lights and I picked a few at a time. I was thinking I might want to make it into a curve and now with round 4: curves, I may just do that. But before I do, I must practice.
There's a bit of a stretch through the middle, that I hope won't interfere with the quilt when I quilt it.
 I think batiks stretch a bit more than other fabric when sewing them and the border is already curved a bit! LOL! :) http://pattilousquilts.blogspot.com/
There's a bit of a stretch through the middle, that I hope won't interfere with the quilt when I quilt it.

LibRR1 Round 4: Curves
Thank you again to all of you who are participating in this online Liberated Round Robin! It's been inspiring to see your creativity!
Those of us needing more time to get caught up, or if you want to add even more rounds inbetween the ones we have suggested - of course go ahead!
For those ready to more on >>>>> Wouldn't it be fun to add some curves to your project?
You can do this by doing applique, sewing bias strips down, sewing circles, making curves seams with different fabric, or _________ (you fill in the blank with your idea!).
As before: please post a photo on this blog when you complete the round (include the measurements and the URL of your blog), and if you have used an internet resource to construct your curved round, do share the link with us or just tell us what you were thinking as you worked on your project. Check back to see what others have done - and do write comments!
Also, be sure to click to verify that the correct information for you has been added to the Who We Are page.
We have at least three weeks to work on this round; our next and final step for this first Liberated Round Robin will be posted on August 12th.** We may push this date back a week or so, to give everyone more of a chance to get caught up.
If there is interest, we'd like to do another Liberated Round Robin sometime in the fall - but this time it will be set up so different people (who participated in this first LibRR) will be able to sign up to write up the directions for a round! An email will be sent out in September.
Thursday, July 21, 2011
Round 2 squares

Finished this round tonight, and quilted the last [bottom] border after adding it. I wasn't sure I wanted to add on all four sides, so there was an "incubation" period while I watched a waited for direction. Finally with the change in colors and size, it seemed like the right thing to add the bottom border in squares also.
The top squares are printed on the fabric, so no complicated construction was required. I liked the idea of having one "regular" set of checkerboards that were NOT wonky to show that this was indeed intended to be a "squares" border.
The other three borders were pieced in a slightly wonky way.
So far the "quilt as you go" method is working well. Current size is 25" x 31"
Sara
June's Lib RR Round One - Triangles

I did the first side (it's on the left in this photo) ages ago then had happy distractions. I was originally planning on making two sets of triangles as I did when I was making some flying geese a while back. But when I tried to make the reverse geese things just would not line up (as I am using the presewn fabric I received in the World Wide Swap) and it looked sloppy and unusable to me.
So I changed my method for making the triangles. I cut the grey fabric strips then used the rotary to cut out triangles. Using different colored pins I put three pins in the fabric for each triangle, (so each was color coded and I was able to remember which pieces went where). Then I used the grey triangle as a template and cut swap material fabric. Then I sewed the short side up - then I pressed the seam open and sewed the other side up.
Before joining to the center block I straightened up the edges... But my project is no longer square - it measures between 19 and 21 inches depending on which side is being measured! It's all flat though so I'm happy with that.
These were the original types of triangles I wanted to make - but I've pretty much mastered this method now so will try not to use it again soon.
I wanted to try the QAYG method for adding rows that Sara described but since I'm behind with the challenge and have used my pins for another project that is waiting to be FMQed, I am just going to go ahead with adding my squares to this project...
So now on to Round 2!
: )
Monday, July 18, 2011
Me and You: True Blue

Round 3!
Busy busy here in the land of garlic, cheese and red wine!
I give you my Round 3

It's looking a lot better now that I've added the blue piano keys and another wide black border.
This is getting big - and I mean big! It's covering up my Haunted Houses quilt which was big enough.
I give you my Round 3

It's looking a lot better now that I've added the blue piano keys and another wide black border.
This is getting big - and I mean big! It's covering up my Haunted Houses quilt which was big enough.
Saturday, July 16, 2011
Me and You: True Blue

Round 2 Encore
Okay! Forget my last post about Round 2.
There has been a massive rethink and a lot of frogging (rippit rippit).

I'm still not happy with it, but I think I can now see where the problem lies.
I've got to continue the next round with blue and then do the same big black border. It may not be liberated, but it's continuity.
There has been a massive rethink and a lot of frogging (rippit rippit).

I'm still not happy with it, but I think I can now see where the problem lies.
I've got to continue the next round with blue and then do the same big black border. It may not be liberated, but it's continuity.
Casa Loma -- all finished

Round 3
 I tried several options, and finally decided the two borders (rectangles) looked best with the fabric I used with the flying geese. As busy as the fabric is, other options looked disjointed.
And I do love the fabric. :)
Wednesday, July 13, 2011

Monday, July 11, 2011
This is so fun!

This is so much fun. There is such a feeling of accomplishment for each new addition.
Now just to get to the rectangles so I can catch up with the rest of you.
Judith in AZ
Saturday, July 9, 2011
Jan Round #3 Rectangles

Friday, July 8, 2011
QAYG borders on LRR

This is how you do it:
I took the top I had with the middle and triangle borders added, and I quilted it. [I think I will add some more quilting in the white spaces later.]
Then I laid out a three fabric sandwich on the edge where the first border will go.


Then you flip the two border fabrics over that seam and press.


Front has grown by one border side [black and white check].

And the back has grown by one border side [darker green].
Not too tough!
And there are no "covering" strips to add over the seam on either side.
Negative side: You can't rip this border off easily if you later want to change your plan!
Sara
Thursday, July 7, 2011
Round 1 Triangles
 I hope the next rounds get easier on this brain of mine. I just get so intimidated knowing that so many of you are going to see it. After worrying about it for several days I just did something fun for me. :)
Subscribe to:
Comments (Atom)