
Saturday, July 30, 2011
Jan---Round 4 Curves
Friday, July 29, 2011
curves!

Hopefully with the last round I can pull it all together!
Thursday, July 28, 2011
Me and You: True Blue

Tuesday, July 26, 2011
Curves, hmmmmm . . .
 I hope my little circles will count for my curves. The star is a half circle that I inset, but it doesn't show. Actually the star was a circle, but I liked the look of the half circle sitting on the rectangle. It still looked a little static to me so I added the little circles to add movement and to encourage the eye to look for all the other dots and circular curvy things. The size is about 31" by 24".
.
Monday, July 25, 2011
June's Lib RR Round Two - Squares

I was going to put the squares at different angles, but decided to keep them oriented so they are all at the same - but they show movement by where they are in the distance from the triangles and distance from each other.
This piece is now 30" x 31" - I'm probably going to trim it so it's square.
Either before or after my round three (rectangles), I'm going to add something to make this so it's more lap sized....
Sunday, July 24, 2011
Round 3 Strips

I had a long band of red and white strips that were left over from an earlier project. I had sewn the little pieces together as Leaders and Enders during that project, and the band was in my Orphan Box. I added a ticking strip on each side.
Altogether it was long enough for two sides, contiguous or the two short sides. This is the choice I made.Current size is 25" X 43".
Sara
Friday, July 22, 2011
Round 3 Rectangles
Finally! I've been thinkin' and thinkin' and the result just looks so easy, but I had to get to a place where I could "cogitate" about the colors. I wanted more lights and I picked a few at a time. I was thinking I might want to make it into a curve and now with round 4: curves, I may just do that. But before I do, I must practice.
There's a bit of a stretch through the middle, that I hope won't interfere with the quilt when I quilt it.
 I think batiks stretch a bit more than other fabric when sewing them and the border is already curved a bit! LOL! :) http://pattilousquilts.blogspot.com/
There's a bit of a stretch through the middle, that I hope won't interfere with the quilt when I quilt it.

LibRR1 Round 4: Curves
Thank you again to all of you who are participating in this online Liberated Round Robin! It's been inspiring to see your creativity!
Those of us needing more time to get caught up, or if you want to add even more rounds inbetween the ones we have suggested - of course go ahead!
For those ready to more on >>>>> Wouldn't it be fun to add some curves to your project?
You can do this by doing applique, sewing bias strips down, sewing circles, making curves seams with different fabric, or _________ (you fill in the blank with your idea!).
As before: please post a photo on this blog when you complete the round (include the measurements and the URL of your blog), and if you have used an internet resource to construct your curved round, do share the link with us or just tell us what you were thinking as you worked on your project. Check back to see what others have done - and do write comments!
Also, be sure to click to verify that the correct information for you has been added to the Who We Are page.
We have at least three weeks to work on this round; our next and final step for this first Liberated Round Robin will be posted on August 12th.** We may push this date back a week or so, to give everyone more of a chance to get caught up.
If there is interest, we'd like to do another Liberated Round Robin sometime in the fall - but this time it will be set up so different people (who participated in this first LibRR) will be able to sign up to write up the directions for a round! An email will be sent out in September.
Thursday, July 21, 2011
Round 2 squares

Finished this round tonight, and quilted the last [bottom] border after adding it. I wasn't sure I wanted to add on all four sides, so there was an "incubation" period while I watched a waited for direction. Finally with the change in colors and size, it seemed like the right thing to add the bottom border in squares also.
The top squares are printed on the fabric, so no complicated construction was required. I liked the idea of having one "regular" set of checkerboards that were NOT wonky to show that this was indeed intended to be a "squares" border.
The other three borders were pieced in a slightly wonky way.
So far the "quilt as you go" method is working well. Current size is 25" x 31"
Sara
June's Lib RR Round One - Triangles

I did the first side (it's on the left in this photo) ages ago then had happy distractions. I was originally planning on making two sets of triangles as I did when I was making some flying geese a while back. But when I tried to make the reverse geese things just would not line up (as I am using the presewn fabric I received in the World Wide Swap) and it looked sloppy and unusable to me.
So I changed my method for making the triangles. I cut the grey fabric strips then used the rotary to cut out triangles. Using different colored pins I put three pins in the fabric for each triangle, (so each was color coded and I was able to remember which pieces went where). Then I used the grey triangle as a template and cut swap material fabric. Then I sewed the short side up - then I pressed the seam open and sewed the other side up.
Before joining to the center block I straightened up the edges... But my project is no longer square - it measures between 19 and 21 inches depending on which side is being measured! It's all flat though so I'm happy with that.
These were the original types of triangles I wanted to make - but I've pretty much mastered this method now so will try not to use it again soon.
I wanted to try the QAYG method for adding rows that Sara described but since I'm behind with the challenge and have used my pins for another project that is waiting to be FMQed, I am just going to go ahead with adding my squares to this project...
So now on to Round 2!
: )
Monday, July 18, 2011
Me and You: True Blue

Round 3!
Busy busy here in the land of garlic, cheese and red wine!
I give you my Round 3

It's looking a lot better now that I've added the blue piano keys and another wide black border.
This is getting big - and I mean big! It's covering up my Haunted Houses quilt which was big enough.
I give you my Round 3

It's looking a lot better now that I've added the blue piano keys and another wide black border.
This is getting big - and I mean big! It's covering up my Haunted Houses quilt which was big enough.
Saturday, July 16, 2011
Me and You: True Blue

Round 2 Encore
Okay! Forget my last post about Round 2.
There has been a massive rethink and a lot of frogging (rippit rippit).

I'm still not happy with it, but I think I can now see where the problem lies.
I've got to continue the next round with blue and then do the same big black border. It may not be liberated, but it's continuity.
There has been a massive rethink and a lot of frogging (rippit rippit).

I'm still not happy with it, but I think I can now see where the problem lies.
I've got to continue the next round with blue and then do the same big black border. It may not be liberated, but it's continuity.
Casa Loma -- all finished

Round 3
 I tried several options, and finally decided the two borders (rectangles) looked best with the fabric I used with the flying geese. As busy as the fabric is, other options looked disjointed.
And I do love the fabric. :)
Wednesday, July 13, 2011

Monday, July 11, 2011
This is so fun!

This is so much fun. There is such a feeling of accomplishment for each new addition.
Now just to get to the rectangles so I can catch up with the rest of you.
Judith in AZ
Saturday, July 9, 2011
Jan Round #3 Rectangles

Friday, July 8, 2011
QAYG borders on LRR

This is how you do it:
I took the top I had with the middle and triangle borders added, and I quilted it. [I think I will add some more quilting in the white spaces later.]
Then I laid out a three fabric sandwich on the edge where the first border will go.


Then you flip the two border fabrics over that seam and press.


Front has grown by one border side [black and white check].

And the back has grown by one border side [darker green].
Not too tough!
And there are no "covering" strips to add over the seam on either side.
Negative side: You can't rip this border off easily if you later want to change your plan!
Sara
Thursday, July 7, 2011
Round 1 Triangles
 I hope the next rounds get easier on this brain of mine. I just get so intimidated knowing that so many of you are going to see it. After worrying about it for several days I just did something fun for me. :)
Round 3 Rectangles
Hi, here's the simple construction I promised :-)

and here's what's left of the border fabric :

I think even the small dark blue stripes are rectangles and you can consider this as a big log-cabin block ;-)
The fabric of the wider log came through our ww-swap into my stash, it's from Kathy and I think it's just perfect . And now it's gone, sigh .
Still having fun with the RR
Heidi
Wednesday, July 6, 2011
Plain borders and Off on a Side Track
My brain finally registered the "suggestion" from several in this group, that adding a "plain" border might help the looks of subsequent borders. I mean, this could actually apply to me and solve why my next border wasn't looking right when I laid it loosely on the top! Huzzah! I added some plain red narrow borders.
Then I read a reminder on Melody's blog that it is easier to quilt borders AS THEY ARE ADDED, than it is to quilt them when they have all BEEN added. Because you will always be working close to the outer edge of the project.
Having that thought in the back of my mind, I was constantly perusing my LRR on my "design wall", and it suddenly stuck me. I could be QUILTING these borders AS I ADDED THEM.
Well that certainly let me off the hook for adding my "squares" border right now!
I set right to work:

I've done all I'm ready to try today.
And now I do have to think about the Squares Border!

Anybody else trying "Quilt-As-You-Go"?
Sara
It's all JUNE's Fault
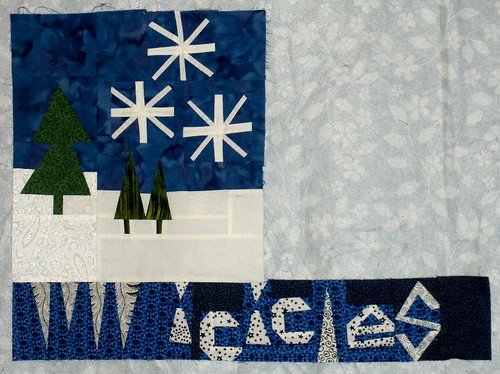
My RR now looks like this on the design wall.
Thanks June for asking the question that prompted me to consider the possibilities and move the icicles row from round 1. Now my L-shaped quilt is C-shaped. I really have to get busy making strips and letters (and maybe more log cabins) and fix that ;-)
Thanks June for asking the question that prompted me to consider the possibilities and move the icicles row from round 1. Now my L-shaped quilt is C-shaped. I really have to get busy making strips and letters (and maybe more log cabins) and fix that ;-)
Tuesday, July 5, 2011
Blue & White Squares - Sophie's Round 2
Here are my borders for round 2:
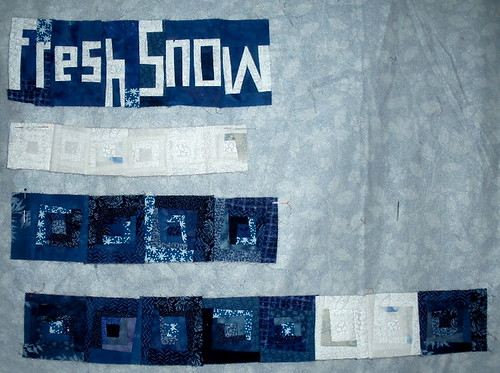
I immediately thought of log cabins as a representation of squares. The large ones are 3-inches–I described the stamped foundation on my blog, here: Log Cabin Squares. For the smaller white ones, I used the same foundations, but didn't add the last round of logs. They are 2-inches. The letters in the word border are based on squares (and have quite a few squares in their construction.) The word row is approximately 4 1/2 inches tall.
Here's how the borders look, sewn in place.
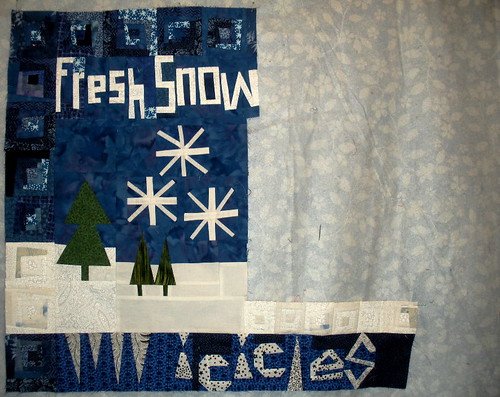
The piece is still, definitely rather L-shaped. I hope to remedy that with round 3.
Because I am always curious about how big the other LibRR's are, I measured mine for you. It's approximately 26 inches tall and 28 inches wide at the bottom edge.
Like Sue R., a theme has emerged for me . . . though it may not yet be obvious to anyone else ;-)
I immediately thought of log cabins as a representation of squares. The large ones are 3-inches–I described the stamped foundation on my blog, here: Log Cabin Squares. For the smaller white ones, I used the same foundations, but didn't add the last round of logs. They are 2-inches. The letters in the word border are based on squares (and have quite a few squares in their construction.) The word row is approximately 4 1/2 inches tall.
Here's how the borders look, sewn in place.
The piece is still, definitely rather L-shaped. I hope to remedy that with round 3.
Because I am always curious about how big the other LibRR's are, I measured mine for you. It's approximately 26 inches tall and 28 inches wide at the bottom edge.
Like Sue R., a theme has emerged for me . . . though it may not yet be obvious to anyone else ;-)
Round 3: Rectangles

I surprised myself by completing Round 3 so quickly by using strips for a slanted border. I cut a piece of thin scrap fabric, 5" wide by the length of the quilt to use as a foundation for the strip piecing, then stitched the strips at a 45 degree angle. I made 2 of these and planned on making 2 more for the round 3 borders. Then....a little laziness crept in. I wondered, "How would this border look if I made it 2" wide instead of 4.5" wide? So I cut each of the 2 strip pieced borders in half lengthwise, and I had 4 borders for round 3.
Auditioning fabrics for a plain border before round 3 wasn't working; nothing looked right. So another quick decision was made: Cut strips of various brown fabrics and stitch them to the quilt in log cabin fashion. My quilt is definitely ready for a wide border in Round 4, so that it will grow to be a lap quilt. It's now 42" x 42".
Monday, July 4, 2011
Round 3: A theme emerges!
As I look at my quilt I see a theme recurring quite unintentionally...at least consciously..evidently it's all about the circles!
Isn't liberated/improvisational quilting exciting? The quilts are infused with the makers' intuitive reactions to color, shape, size, balance, pattern...
![]()
The Liberated Round Robin project is so satisfying...quilts incubating and emerging little by little...it's tantalizing..no wonder we love it so! A journey undertaken with not as much thought given to the end, as the complete enjoyment of the process. It is the journey..not the end that is so wonderful! Perhaps my quilt shall be named Zen!
Isn't liberated/improvisational quilting exciting? The quilts are infused with the makers' intuitive reactions to color, shape, size, balance, pattern...

Rounds 2 and 3!
 I left town to go to my stepson's wedding and you guys did Rounds 2 and 3! I had to play catch-up. Round 2 was squares. Hmmm...my squares are log cabins and I tried putting them around the triangles, but the design was less than pleasing, so I took out some of the triangles and installed log cabins. Then I decided it needed a border and Round 3 was strips. How fortunate. So a mostly blue, some green, and a little pink piano key border was next. It's the start of a happy quilt, but it's getting big, it's 31" x 44" now. How long are we doing this? And what am I going to do with all those little left-over log cabins???
 Round 2 complete

I decided, it's complete. On one hand, I just had enough of making these squares, on the other hand I don't want this to get so big and thought it already looks a bit crowded.
And with that decision, I still haven't cut into the 'real stash'. Still using my scraps.
After some pondering I know what to make for the next round, it will be a very simple construction.
:-)
Heidi
Sunday, July 3, 2011


Oh Boy!
Oops, I hit the return and it posted before I wrote anything. this is my first post to a blog, scary. I am joining your Lib-RR at a late point, but hope to catch up. This seems like so much fun!
Jumping in!

Saturday, July 2, 2011
Sophie's Triangle Round
I've added borders to the left and bottom of my center.
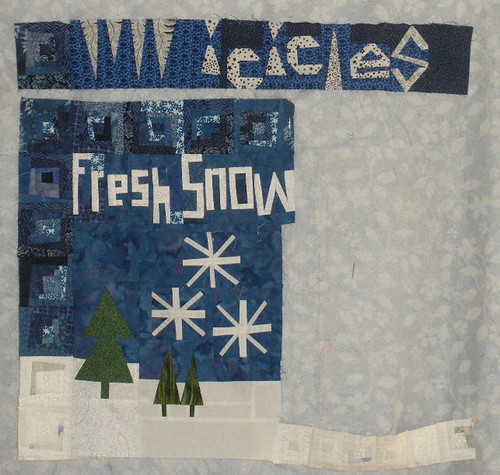
I knew immediately I wanted to make triangle shaped icicles for round 2–the quilt insisted that I add the word icicles and that it had to be on the same border with the icicles themselves. If you look closely at the letters, you'll see that all but the c's are based on triangles. The large tree (made from triangles) was an easy choice. I made it much larger than the existing trees in an attempt to create a little perspective in my snowy landscape.
I didn't find a rule that said the borders actually had to fit the sides of the quilt-in-progress, so I figured it was OK to be liberated and leave it hanging off the edge. I'll have to deal with it eventually, but for now, my quilt is L-shaped ;-)
My fabric choices were meant to add some print and texture to the work-in-progress while continuing the graphic, simple blue and white center.
(Pay no attention to the pattern from my flannel-backed tablecloth showing through ;-)
I knew immediately I wanted to make triangle shaped icicles for round 2–the quilt insisted that I add the word icicles and that it had to be on the same border with the icicles themselves. If you look closely at the letters, you'll see that all but the c's are based on triangles. The large tree (made from triangles) was an easy choice. I made it much larger than the existing trees in an attempt to create a little perspective in my snowy landscape.
I didn't find a rule that said the borders actually had to fit the sides of the quilt-in-progress, so I figured it was OK to be liberated and leave it hanging off the edge. I'll have to deal with it eventually, but for now, my quilt is L-shaped ;-)
My fabric choices were meant to add some print and texture to the work-in-progress while continuing the graphic, simple blue and white center.
From 'On point' to ' Square'

For this Round I decided to bring my block 'on square' in which I placed liberated square blocks. This brought the colours from the previous round into the scheme. Now looking forward to the following round.
Friday, July 1, 2011
LibRR1 Round 3: Strips, Strings and Rectangles
Make one or more borders using these elements. Run them horizontally or vertically; make wonky log cabins or string blocks; cut stripsets into other shapes; or add liberated letters.
Remember that squares are also in the rectangle family....try liberating Bargello, Irish Chain, or Trip Around the World blocks, to name a few.
Add plain borders as needed to make your quilt visually pleasing.
Added July 5th by JD: Please include the measurements of your project in your post and double check the Who We Are page to be sure the correct information is included for you!
Added July 5th by JD: Please include the measurements of your project in your post and double check the Who We Are page to be sure the correct information is included for you!
Subscribe to:
Posts (Atom)