
Showing posts with label LibRR1 Round 1 Triangles. Show all posts
Showing posts with label LibRR1 Round 1 Triangles. Show all posts
Thursday, February 16, 2012
Am I the Slowest one?
Round 2 Triangles Finished and I displayed the piece at a local art show. So squares next? perhaps I'll be faster with this round, thank-you for the inspiration.


Thursday, December 8, 2011
A Little Progress....

Thursday, July 21, 2011
June's Lib RR Round One - Triangles

I did the first side (it's on the left in this photo) ages ago then had happy distractions. I was originally planning on making two sets of triangles as I did when I was making some flying geese a while back. But when I tried to make the reverse geese things just would not line up (as I am using the presewn fabric I received in the World Wide Swap) and it looked sloppy and unusable to me.
So I changed my method for making the triangles. I cut the grey fabric strips then used the rotary to cut out triangles. Using different colored pins I put three pins in the fabric for each triangle, (so each was color coded and I was able to remember which pieces went where). Then I used the grey triangle as a template and cut swap material fabric. Then I sewed the short side up - then I pressed the seam open and sewed the other side up.
Before joining to the center block I straightened up the edges... But my project is no longer square - it measures between 19 and 21 inches depending on which side is being measured! It's all flat though so I'm happy with that.
These were the original types of triangles I wanted to make - but I've pretty much mastered this method now so will try not to use it again soon.
I wanted to try the QAYG method for adding rows that Sara described but since I'm behind with the challenge and have used my pins for another project that is waiting to be FMQed, I am just going to go ahead with adding my squares to this project...
So now on to Round 2!
: )
Saturday, July 16, 2011
Me and You: True Blue

Thursday, July 7, 2011
Round 1 Triangles
 I hope the next rounds get easier on this brain of mine. I just get so intimidated knowing that so many of you are going to see it. After worrying about it for several days I just did something fun for me. :)
Wednesday, July 6, 2011
Plain borders and Off on a Side Track
My brain finally registered the "suggestion" from several in this group, that adding a "plain" border might help the looks of subsequent borders. I mean, this could actually apply to me and solve why my next border wasn't looking right when I laid it loosely on the top! Huzzah! I added some plain red narrow borders.
Then I read a reminder on Melody's blog that it is easier to quilt borders AS THEY ARE ADDED, than it is to quilt them when they have all BEEN added. Because you will always be working close to the outer edge of the project.
Having that thought in the back of my mind, I was constantly perusing my LRR on my "design wall", and it suddenly stuck me. I could be QUILTING these borders AS I ADDED THEM.
Well that certainly let me off the hook for adding my "squares" border right now!
I set right to work:

I've done all I'm ready to try today.
And now I do have to think about the Squares Border!

Anybody else trying "Quilt-As-You-Go"?
Sara
It's all JUNE's Fault
My RR now looks like this on the design wall.
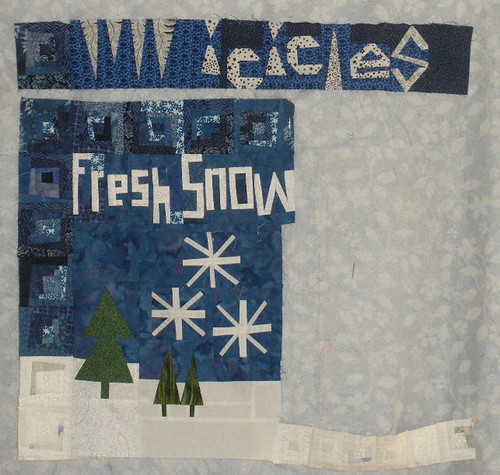
Thanks June for asking the question that prompted me to consider the possibilities and move the icicles row from round 1. Now my L-shaped quilt is C-shaped. I really have to get busy making strips and letters (and maybe more log cabins) and fix that ;-)
Thanks June for asking the question that prompted me to consider the possibilities and move the icicles row from round 1. Now my L-shaped quilt is C-shaped. I really have to get busy making strips and letters (and maybe more log cabins) and fix that ;-)
Sunday, July 3, 2011
Jumping in!

Saturday, July 2, 2011
Sophie's Triangle Round
I've added borders to the left and bottom of my center.
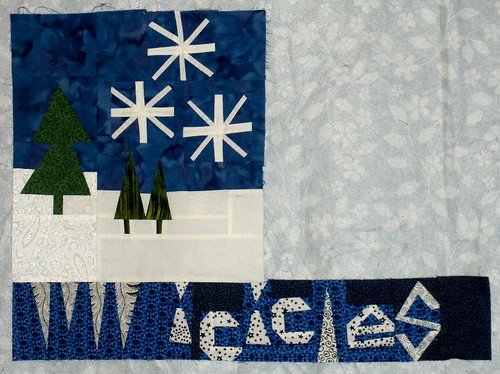
I knew immediately I wanted to make triangle shaped icicles for round 2–the quilt insisted that I add the word icicles and that it had to be on the same border with the icicles themselves. If you look closely at the letters, you'll see that all but the c's are based on triangles. The large tree (made from triangles) was an easy choice. I made it much larger than the existing trees in an attempt to create a little perspective in my snowy landscape.
I didn't find a rule that said the borders actually had to fit the sides of the quilt-in-progress, so I figured it was OK to be liberated and leave it hanging off the edge. I'll have to deal with it eventually, but for now, my quilt is L-shaped ;-)
My fabric choices were meant to add some print and texture to the work-in-progress while continuing the graphic, simple blue and white center.
(Pay no attention to the pattern from my flannel-backed tablecloth showing through ;-)
I knew immediately I wanted to make triangle shaped icicles for round 2–the quilt insisted that I add the word icicles and that it had to be on the same border with the icicles themselves. If you look closely at the letters, you'll see that all but the c's are based on triangles. The large tree (made from triangles) was an easy choice. I made it much larger than the existing trees in an attempt to create a little perspective in my snowy landscape.
I didn't find a rule that said the borders actually had to fit the sides of the quilt-in-progress, so I figured it was OK to be liberated and leave it hanging off the edge. I'll have to deal with it eventually, but for now, my quilt is L-shaped ;-)
My fabric choices were meant to add some print and texture to the work-in-progress while continuing the graphic, simple blue and white center.
Monday, June 20, 2011
I've made a start

Being new to liberated quilting, it's taken me a while to pluck up the courage to start this project! But when I found this block last week, I thought it had potential and put it up on my design wall. Today I decided that it was time to bite the bullet and play.
The block is from an applique class I did at a Quilt Expo in The Hague just after I first started patchwork. It is one of three or four blocks I brought home but I didn't have the confidence to take it any further. I still have to stitch the small dugong, but that will have to wait until I can buy some matching thread. I forgot to take a photo of the original block before I started playing with it, but it was just the dugongs with blue and yellow border pieces, which I've cut down a bit. The rest of the fabrics came from my drawer of leftover scraps.
There are very few triangles really, but I'm satisfied with it so far because it feels triangular.
Tuesday, June 14, 2011

Monday, June 13, 2011
Liberated?

I'm discouraged about my LRR. I think I unliberated it when I added that border print around the original block. I'm thinking about replacing it. What do you think? I'd appreciate feedback. Thanks. Darlene
Friday, June 10, 2011
Triangles added

I like my first block but it is a tad too busy or maybe way too busy so I chose to calm it with the solid blue but carried forward the bike fabric. I like it! I like everyone else's too!
Wednesday, June 1, 2011
Joy's triangles

http://suesjourneys.blogspot.com/
Round 1 complete

This is how Round 1 ended for me :-) .
I'm not quite sure if I like the small yellow stripe, but I leave it as it is. For now I've only used my scrap bins, I'm curious when I'm going to have to use the 'real' stash .
Heidi
Monday, May 30, 2011
Floral Fantasy

This photo shows my central block which is a Foundation pieced Flower.Floral Fantas
The 1st Border I did my triangles in Liberated Style, the colours of the Rainbow
Irene Vernon
Sunday, May 29, 2011

Saturday, May 28, 2011
Round Robin

Round 1, triangles. Let me start by saying this is my first Round Robin. Ever. I decided to start this quilt with my newly acquired skill of invisible machine applique. So I started with rounded organic shapes. But when the call came for triangles, I was somewhat stumped. Triangles are straight three sided shapes with POINTS. How could I do that using invisible machine applique? Reverse applique? I changed to machine piecing for Round 1, what liberated this round was not drafting it and not paper piecing it. I just cut random triangles (and a few other shapes), then added some stripes for motion. Sort of a quilt as you go theme, it certainly woke up my imagination. I could have fiddled on and on changing one more shape to become a triangle, but I liked the way it looked. So I stopped fiddling. I am ready for the next round. ps. modified 6/2 to change the Round to #1!!! Now I will be on the same "page" as everyone else.....
round 1 triangles

Thursday, May 26, 2011
Round #1 Completed

Instead of squares made with liberated triangles, I decided to work with rectangles; I split the rectangles unevenly and added liberated triangles to make the top and bottom borders of Round #1.
Before I attached these borders, I recut the light fabrics around the center shoofly block so that the block sits straight. Originally the light fabrics had surrounded the shoofly block with the "recut" technique so that the block sat at an angle. Now I wish I had left the shoofly block at an angle--but I'm sure this will work out fine.
I'm trying to use fabrics that are less traditional in design than I have been using recently. I can't escape the traditionals completely, because that's what I have, but so far I've worked in the brown-turquoise print plus the brown circle print. Ok, they aren't exactly wild, but I'm trying!
I'm looking forward to the next round. This is the perfect project to experiment with techniques and with "wild" prints.
Subscribe to:
Posts (Atom)