Wednesday, March 21, 2012

Pattilou--Round 1

I'm trying not to overthink this, as I want to add more.  I had these blocks from Clare from last year's Worldwide Swap.
And I rearranged them thinking that since they were block pieces I didn't need to cut them.
I had some hand dyed fabric that I had dyed some time ago.  I made my first block.
I'm leaving the angle in the upper right corner as I may want to add something later on.

So, that is my first round--now complete!
Pattilou (aka Pat F)

Linda Kay's Step One

I don't have much in the way of orphan blocks, so decided to go with the wonky house that doesn't quite go with the other wonky birdhouses for a quilt I have in progress.

So I sliced it and added some words from a fabric in my stash.  I may still add some borders around it, but haven't decided yet.  May wait to see what the next step is in the process.

Tuesday, March 20, 2012

Center - Round 1 Done


I decided to work with 2 different blocks and see which I like better at the end.   I had a pansy block left after not following directions and then I had several 2.5 blocks from a table runner and some pink swaps so here we go.

My First Round

I promise you - when you've spent hours planning what to do for everyone else and you get to start, it ain't as easy as it sounds.

I thought and thought and thought and eventually came up with this for starters.


Made up of pieces sent to me by Nancie V and Nann in the 2011 and 2012 Worldwide Swaps.

It grew a bit bigger and then I started slashing.

This is what resulted.


Umm - needs something else - a bit of Chartreuse Green perhaps?


I forgot how much fabric stretches when slashed. Nothing matches! That's liberated for you!

Looking forward to the next round.


Monday, March 19, 2012

Mary's Step I

Recently I decided to make a paper-pieced star but  it has been many years since I've used that technique, so I first made a "prototype." I just didn't want to risk my really good fabric from the US if I didn't like the design or couldn't manage the technique. For the prototype, I used material from my stash that I had purchased here in Panama and knew I could replace if necessary. (And for sure, the fabric selection in Panama is mighty slim!) I didn't put the final wide borders on the block the pattern called for since that posed no challenge. (But oh my goodness, paper-pieceing is so much more fiddledy than our wonderful, free-spirited Liberated Quilting!!) The good news is that this block made of totally uncoordinated fabrics might turn into Step I for our RR II.
Not such a pretty picture, right? 


So I chopped off the little navy flange then whacked a couple of times across the whole shebang and inserted curvy scraps. Next I diced the entire piece and flipped the parts left to right. Now what? 


Okay, add some sashing. But I'm still dreadfully unhappy -- how Fugly can it get?!! And I realize the turquoise is a very big problem: it's NOT 100% cotton since my hot iron has made it pucker! Furthermore, it has inadvertently ended up making a big X across the whole square - how did THAT happen? So I chop off as many big pieces of the turquoise as I can manage.

.

Add a bit of green at a wonky angle and voila! I declare the block Step One -- hardly any resemblance to where it all began! Wheeee! Wonder what's next?


Amy's beginning blocks


These are my blocks--I have 8 of each and I'm gonna do something really interesting with them...to be continued!

Step One: I've Made a Start


I've made a simple block for the center of my liberated round robin quilt by taking an old 9-patch and adding the blue scraps to the corners. But some of the blues weren't large enough, so I added the burgundy. Then came the slash and two black fabrics from my scrap bin.
the block is 6.5" x 6.5" so my quilt won't be too large.
(As I'm typing this, all the words are underlined--I don't know why; I wonder if the lines will show up when I hit 'publish'? :).

Janet's Round One


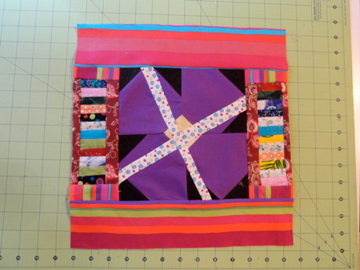
I'm so excited to start round one of the Liberated Round Robin.  I have these 5 stack and slash liberated stars that were an experiment of the technique.  They have been sitting around for quite some time with no idea what to do with them.  The violet some of you might recognize from Block Lotto.  This is one that I rejected because it didn't line up right.  So these are the orphans I am starting with.  I only used one of the stars for this start.  Maybe some of the others will find a use later.  We'll see.

I think I like it.

Sunday, March 18, 2012

Cyndi's Step 1

 I started with two orphan blocks. The first was a Chinese Coins block that I made incorrectly - but couldn't just throw away. The other was a leftover pansy from Block Lotto


A couple of slashes, insertion of some flowery strips, dividing the Chinese Coins, and adding a little striped fabric, and here we go!

Saturday, March 17, 2012

Yippee!

I have some orphan blocks in mind that I think will work wonderfully for this step besides getting them off my back. It's great to join in on this fun. Thanks June, Claire, Mary and others for organizing this. I am looking forward to stretching out my creativity and perhaps get a rigorous training for my liberation.

Jane

Friday, March 16, 2012

Round 1 Completed

This is a 24 inch block that was created by the add a border group on Flickr. My round was the last border which I created from leftover pieces from a previous project. Since the middle and my border are already liberated I want to use this and make it bigger. I hope that will be ok. I consider this to be one of my orphan blocks. I am looking forward to learning new techniques.

Thanks Carol (Ladybug)

Round 1 Completed

It has been very quiet around the homestead today.  Hubby is trying to get over the Spring Bug that has everyone coughing, sneezing, and just plain feeling bad.  So, before Missouri started to get into the second half of their NCAA Tournament basketball game, I thought I would take a few minutes to hunt up an orphan block for LibRR2.  Well I just couldn't stop myself and I finished Round 1.  Clare this was fun, thanks for getting us started.
My orphaned block was a hand pieced Log Cabin.  Probably made around the 1950's as it is made from feed sack.
The block was a 6" square.  I decided to add some punch with a new piece of black and white dot cotton.  I put away the rotary cutter and just made some slight curved slices.  Restitched (using the machine).  Then since I like small quilts I dug out the ruler and rotary cutter and trimmed the block to a 5 1/4" square. 
So here is my beginning, it will be fun to see where we go from here.

Flower Ladies

Just completed!
I started this while at the February Retreat with Freddy Moran and Gwen Marston (put on by the Santa Barbara Quilt Retreats).

LibRR2 - First Round - Going For It!

Welcome to the first round of the Liberated Round Robin 2012.

This is Clare speaking.

If you are new to this, and liberated quilting, then you can read about what I do on my blog, Dordogne Quilter. I suggest you read that first before going any further so you know what you're letting yourself in for LOL! I'm warning you - this is not for the faint hearted.

Are you ready?

When I did the last challenge I got completely stuck. I started with this


which soon became this


and I'd like you to do something similar.

Have you got a BoM that isn't really "you" and you don't know what to do with it? Or a traditional block (or blocks) in your Parts Dept that you've been meaning to use for something and not quite sure what? Well, now's your chance to break out of the box and liberate it.

Look at your block and think what you could do with it. Perhaps you could slash it using some funky fabric?

There are some links from the And Now We Set It on Fire blog which may give you some inspiration.

This is the first one, this is what she decided to do with them, and this is what it looked like when she'd finished.

I'm not asking you to do something as big as this, but it may give you some ideas.

Tonya Riccuci has a brilliant free piecing tutorial which you can find here and then click on the UnRuly Piecing Basics to download the PDF tutorial. Tonya sets out the basics for liberated free piecing and after you've cut your block you can add parts and do whatever you'd like to it.

If you have any queries, please leave a comment on this post and I'll see if I can help you.

Just remember the liberated piecing basics.

If it's too short, add to it;

if it's too long cut it; and, above all

HAVE FUN!

Clare

URLs of Links in this post:
http://dordognequilter.blogspot.com
http://andthenwesetitonfire.blogspot.com/2012/01/my-book-is-here.html
http://andthenwesetitonfire.blogspot.com/2012/01/my-first-kick-at-can.html
http://andthenwesetitonfire.blogspot.com/2012/01/finished.html
http://www.unrulyquilter.com/tutorials/

Once you have the pieces for your first round completed, please take a photo and post it to the blog.  Please do this before 6 April when the second step will be posted!

Tuesday, March 13, 2012

New

I am new to the Liberated Round Robin. I sure do look forward to this fun time.
Dorothy Matheson